3D printers are amazing machines that can create 3D objects from digital designs. But to get the best results, you have to make sure the build platform, or bed, is level. When your 3D printer bed is not well leveled, it will affect the quality of your prints as the layers may not print accurately or evenly.
With the steps below, you’ll be leveling the bed in no time! But before that, let’s take a look at the reasons why you need to level your 3D printer bed.
Why you need to level your 3D printer bed
Leveling your 3D printer bed is critical to the quality of your prints. Here are five reasons why you need to do so.
To improve first-layer adhesion: If your bed is too high or low in some areas, your filament may not adhere properly to the build plate, and this may cause your print to loosen and potentially ruin the entire print. Jobs can be ruined.
To reduce stringing and leakage: Stringing and leakage occurs when the filament melts too much and drips from the nozzle, and an uneven bed can cause this. So leveling it up can help reduce these issues.
To eliminate zits and voids: Zits and voids are small imperfections that can appear in a print. They are usually caused by an uneven bed.
To avoid warping: Warping occurs when the filament cools unevenly, causing the print to curl or deform. Leveling the bed can help reduce the risk of warping.
To reduce rafts and supports: Rafts and 3D printing supports are essential for some prints, but they can add unnecessary time and effort to the printing process. If you level the bed correctly, you can reduce or eliminate the need for them.
Shut down and unplug your 3D printer
Before starting to level the bed it is necessary to turn off your 3D printer and unplug it from the power source. Ideally, it would be best to do this at the beginning of each print job. Leaving it connected to power while it is making adjustments can cause a number of problems, such as overheating and power surges.
Turning off and unplugging your 3D printer before making any adjustments is also essential to prevent accidents such as electric shock, especially if the liquid comes into contact with electricity.
Clean your 3d printer bed
To start the cleaning process, add a small amount of isopropyl alcohol to a clean piece of cloth and begin scrubbing your 3D printer bed. As you work, be sure to scrape off any excess lint or dust that may be sitting on the surface of the bed.
Let the cleaning solution soak the bedding for a few minutes to remove any dirt and grease. When you’re finished cleaning, rinse the bedding in hot water and pat it dry with a towel or clean cloth.
Cleaning the 3D printer bed is important because it provides a smooth surface for your filament to adhere to, resulting in better quality and accuracy in your prints. In addition, any stray material is removed from the bed prior to printing, minimizing imperfections and other problems with the edges of your finished designs.
Use a piece of paper to level your 3D printer bed
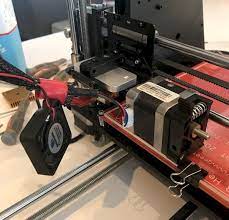
Begin by making sure the 3D printer nozzle is positioned in the center of your bed, as shown below.
Next, place a piece of paper on the bed and slowly lower the nozzle until it barely touches the paper or feels like it’s caught between the bed and the nozzle.
Keep sliding the paper back and forth around the four corners of your bed until you find the spot where the piece of paper offers the least resistance. This place is usually the place where the bed is flat. Finally, once you’ve got the location level, tighten all the screws on your bed so it won’t move during printing.
Screw up
An Allen wrench or a screwdriver is a fast and efficient tool for tightening screws. Start by locating the small bolts that hold the bed in place, then place the wrench or screwdriver on a screw and turn it clockwise until you feel resistance.
Put the Allen wrench down, align it with the other screw, and repeat the process. Just be careful not to over-tighten them, as this could dislodge the bolt heads or damage the floor of your 3D printer.
Once you’ve firmly tightened all of the bed screws, double-check that they’re still secure, and then you’re ready to start using your 3D printer as usual.
Print test
Once you’ve leveled the bed, the next step is to do a test print to check for alignment issues and make appropriate adjustments. A good example of a test print is the Bed Leveling Calibration object created by MyPc67. This item is ideal for assessing the ability of your printer to obtain a smooth and flat surface.
Another interesting model is the CHEP Manual Bed Level made by CHEP.


